The Model Car Showroom
Reviews, pictures, hints, and links 1/24, 1/25 car kits
X-RAY: 1974 Chevrolet Corvette Stingray Convertible, 1/25, AMT


For this X-Ray have a CRAZY-RARE 1974 Chevrolet Corvette Stingray Convertible, 1/25, AMT. This kit includes:
1 sets of tires with slicks and two sets of rims; 350, V8; reasonable convertible interior; 2 side exhausts, 2 reg exhausts; race decals only. You can make a street/custom ride out of this one too with a supercharger, exhaust, wrap-around windshield, taillights, and front end. Good: Looks like a nice builder with tons of extras; Bad: Most AMT Corvettes have hood-fit issues; no Corvette/Chevy decals, EXTREMELY rare and expensive.
Price: ~$75+
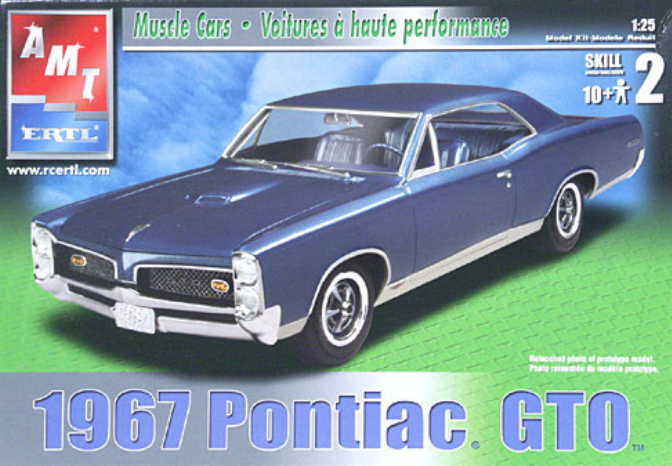
’67 Pontiac GTO

This is a review of the AMT 1967 Pontiac GTO Kit#38058
This kit is actually many years in the making. I had tried a build of this car a long while ago and I had run into so many issues, I just threw it away. This could be the WORST kit AMT ever issued. There is so much wrong that I will be delving ad-nauseum into its horrors. The worst part is – it IS a beautiful car and one that deserves better. Here we go….
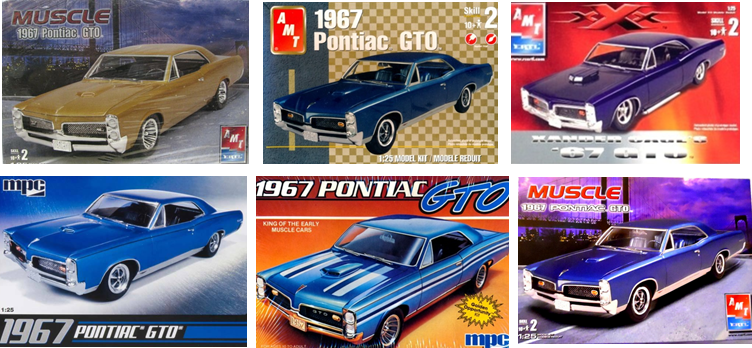
How so many kits could be spawned from such a terrible molding, I cannot imagine. The above kits are all of the same horrifying design and only in minute ways are they worse than each other. Like the XXX version has a goofy-ass hood scoop, and the one on the bottom left is molded in a despicable blue. Each kit comes with some “street” add-ons, but nothing otherworldly. There is a supercharger you can throw on, but it is small and the chrome is lousy. You can jack-up the rear some, add giant headers and side exhaust, roll cage and rims, but in the end, you will still have a model kit from the pit of hell.
CAR BACKGROUND :: Call it a GOAT or a tiger… just don’t call it a Tempest. The GTO name, now its own model, carried a big stick in 1967 and that could be made into a “club” by the boys at Bobcat. Either way, the new 400ci was a real treat – to the tune of 360hp with the ram air package. In the hand of the Bobcat boys, this car ran some of the quickest quarters of the period. But, low 13s in the quarter were only part of the equation. The car sold like there was no tomorrow and is considered to be the best selling muscle car ever produced. All of the above was beside the point. What you had was one of the sharpest, quickest muscle cars they made, PERIOD. Go tiger!!
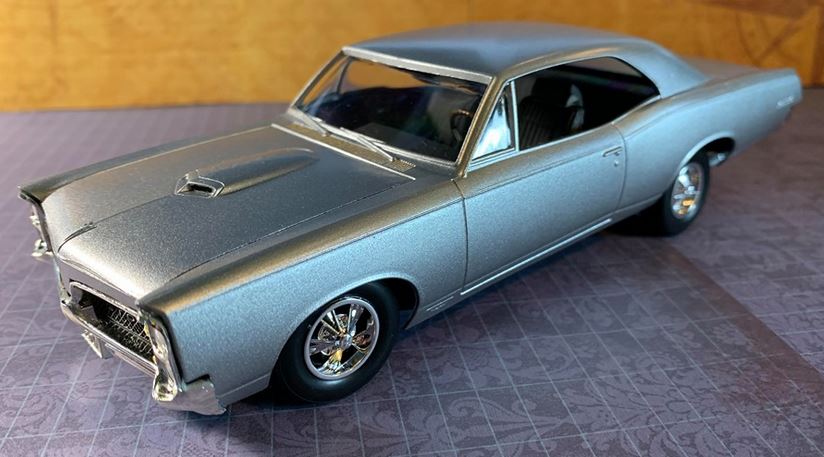
Honestly…. the car came out better than I expected, but not for the effort and cost involved. The car stated out Tamiya Mica Blue, but was changed to Testors Diamond Dust for many reasons (more later). It works, but barely. I really wanted to make this one because it is such commonplace at all the car shows. I had wished it a quality fit to the car’s greatness… and it just wasn’t. So what’s wrong? Where to start?…
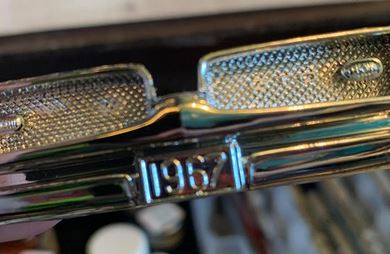
- The front bumper/grille combo fits as good as a speedo on a sumo wrestler. The top doesn’t match AT ALL and is only barely acceptable after much bending and trimming. I’m not kidding when I say it is completely flawed. The quality of the chrome is hit and miss as well. The one pictured here is terrible but thankfully I had a spare. And PLEASE tell me why we have to have a “1967” the size of an engine block on the front of this beautiful car??

- The rear of the car is just disgusting. First off, the light slots are too big. I’ve done some proportion measuring and these slits are nowhere close to the right size. Add to that, they are supposed to be chromed around the insides ONLY. VERY tough to fool with. The PONTIAC writing wasn’t on the GTO’s rear valance either. I’ve scoured the internet and only the Tempest seems to have it AND its letters are smaller. There is also no lip chrome (where I added it) so it is tough to get it right as well. All in all the silver helps, but still a sad facsimile.

- Thennnn there is the rocker and radiator. The radiator is nothing more than the horrible cross-support that a bunch of AMT kits have. They look FAKE. I cannot believe that AMT’s idea for a radiator support is a smooth piece of plastic. Worse still, there are two huge holes in it where the older screw kits would have inserted. The rocker has a VERY light line where it is supposed to be chrome. You can either use foil… which I hate, or paint it… which looks terrible. There is a LOT of chrome to have to do here and it is an unfortunate setup.
There is more, but I’ll tackle it one at a time…

This IS THE one bright spot to the whole kit. The interior is actually pretty detailed and it has everything needed. The rear-view mirror is crap and the headrests are terribly made, but the rest can actually look proper when done. I used wood accents to spice it up and the dash is a well designed one with a lot of things to paint up. I’ve seen two-tone interiors that look even better, but I really couldn’t put a $10,000 door on a outhouse. Of note, I have since added a date appropriate side mirror too (not included in any of the above kits).
From really good to really awful. The engine bay is EMPTY and had to be helped more than any kit should. After cutting away the stupid plastic piece, I used an extra radiator from another kit and a hose from a 69 GTO – which both look more authentic than the plastic wall that was attached to the body and no hose. From there I used a tri-carb setup even though not available in 1967. So… theoretically this is a 400ci, tri-carb. I could NOT bring myself to put the ugly, stock kit’s 4-barrel setup under this hood. It is bad enough that it is so ill proportioned that you could fit TWO engines here and have room left, I couldn’t have the lame stock setup as well. The battery and firewall are “OK” and I was done at that point.

The bottom of this car isn’t too bad to look at. That is where the “isn’t too bad” stops. The exhaust looks decent, but the axle is a flash-infused mess. There is no attach point where the axle meets the frame and the mold is very poor quality. Then there are the holes for the axle-rod. COMPLETELY off center in front AND back. I had to drill new holes altogether to make this work. I thought AMT gave the wrong chassis in the kit to begin with because when I put it together, the tires were rubbing the wheel wells both in front AND back of the car! And, holy crap the tires/rims! You’d think a blind maniac thought this through. The hubs are lousy (both look and quality) and are supposed to reside inside – what appears to be – Jeep Cherokee tires. I’m serious.. these things look as “1967” as a cell phone. Last bit of “really?” has to be the “spikes” on the chassis that attach to the body. These are useful if it were a screw-bottom chassis, but otherwise just serve as something else to glue. I am not a fan of permanent gluing anyways because I’ve taken kits apart to clean many a-time.

I will NEVER do this car again. And, with that, I can say I DID BUILD IT. I had to add a radiator, radiator hose, intake, tri-carb, valve covers (originals were garbage), side mirror, rear view mirror, rims, tires, axle holes (plastic for drilling), side mirror (didn’t come with), directional stalk, front bumper (one from this kit was weathered/faded), two spray cans of paint (too much detail to work with the blue), exhaust tips… and I still could have changed out the front seats (head-rests suck), and the master cylinder (so small you can’t even see it). The ONLY model I’ve had to work this hard getting right was the AMC I did and that was supposed to be a schmuck because it was a “pro stock” model and didn’t come with stock pieces. I could say that the “good” side of this model is the price (~$17), but you would have to waste so much time and money making it right, you’d be better off getting a ’66 GTO from Revell. It is a TRUE GOAT.
1.5 – R.I.P.
X-RAY: 1970 Oldsmobile 442, 1/25, Jo-han


For this X-Ray we’re looking at the Jo-Han 1970 Oldsmobile 442. This kit includes:
One set of tires/rims; custom grille and rear valance; well detailed interior; stock engine with no upgrades. Good: This rare kit is a good build; nothing extra needed. Bad: Box shows 1969 rear as part of the “features”; very little extras to go with custom front/rear; EXPENSIVE.
Price: ~$50+
X-RAY: 1967 Chevrolet Corvette Convertible, 1/25, Revell


For this X-Ray we’re looking at the Revell Chevrolet Corvette Convertible 427. This kit includes:
2 sets of tires/rims – one stock, one street; 427, V8; nice convertible interior; 2 side exhausts; extensive decals (with aftermarket 427 stripe not found in original Revell/Monogram kit. This kit has plenty of aftermarket goodies, including rims, hood, exhaust, and more. Good: Really nice convertible with a lot of parts options; 427 Corvette can’t be bad! Bad: Windshield surround makes for scary windshield installation; wipers are a bit big and bulky; both hoods are problematic fits.
Price: ~$18 (Hobby Lobby w/coupon)
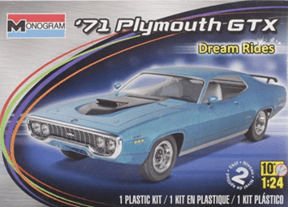
’71 Plymouth GTX
This is a review of the Revell 1971 Plymouth GTX Kit#7608

This car has a story inside a story and it is a doozy. My son Aaron, who was born at just 2 pounds 18 years ago, was in an incubator for 46 days. It was a traumatic experience for my wife and I and is one we hope doctors will find a solution to for others. While there, I gave him a small Johnny Lightning car of a 1971 Plymouth GTX. It wasn’t anything special (as far as the car was concerned), I just wanted to give my new son something as soon as I could… just in case of the unspeakable. Suffice to say, he did very well in the wonderful WVU NICU and came home about the same time as his due date. He has had no real problems since and is now ready for college. I have since wanted to do a homage to the car in the bottle… so to speak… and this is it.
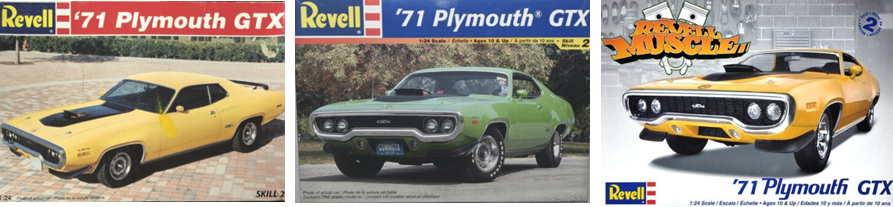
The above Revell kits have very little different and all come with the same decals sets. I think the only thing different is that the Revell Muscle has a few extras in it and the kit to the left is molded in yellow. All of these will give a sweet build though, and all should be around the same price. The two below are kind of evil stepchildren. The GTX is made by MPC – so not as good quality as the Revell kits – AND it is as rare as a rainbow-farting unicorn. The Satellite is a REALLY nice substitute for the GTX and has the sporty molded hood with the slots for engine numbers. It is molded in a horrifyingly cheap, black plastic and it is usually beyond expensive, but a nice kit/car nonetheless.


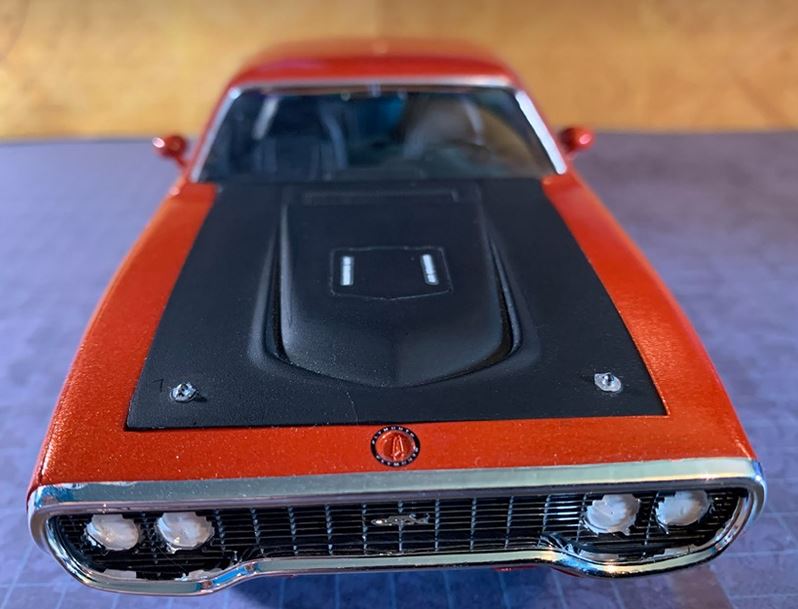
CAR BACKGROUND :: The 1971 GTX was an all new body from the very “rectangle” one from 1970 and there is a lot of discussion as to whether it is even remotely attractive. I happen to like the 1971-1974 Satellites and think that they are underrated muscle cars. The 1971 was the last high-power 440 GTX you could get – with the 6-pack thumping to the tune of 385hp. And like the others in the Mopar stable, the color selections were as vivid as a gay pride march. Not that colors mattered on the dragstrip. Punch the accelerator and this beast would rocket to 104 mph in under 14 seconds. Between the heavy growl of the 440 (which I know and love) and the intimidating ram air scoop rising up to inhale gobs of air, you’d be in heaven rocketing down the ¼mile everytime!
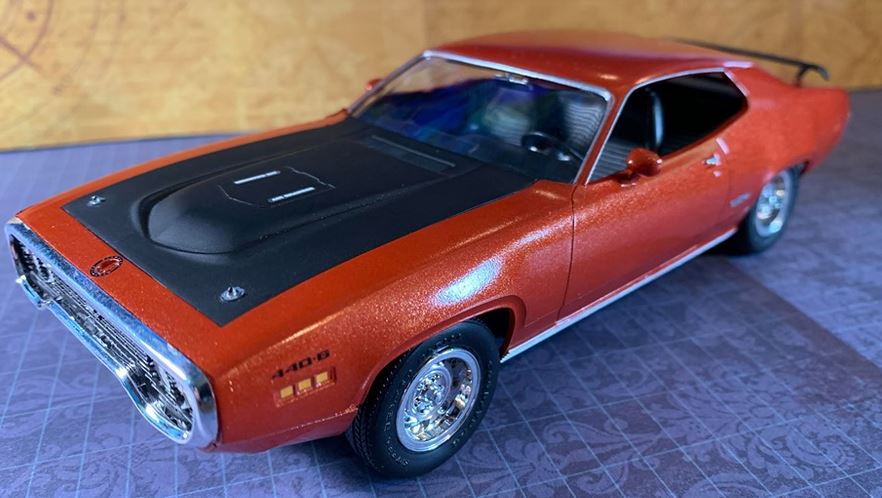
So.. obviously I had to go with the Hemi Orange that the toy car was. This paint job was more involved than typical, however. I started with a base coat of Flaming Orange and then topped it off with the Hemi Orange after the first coat dried. It made for a super glossy finish. I decided to not use the huge Plymouth decals for the rear quarters (as like the toy) because these GTXs didn’t come with them. I also like to save them for any Mopars that could use some sprucing up.. and this one doesn’t need it.

I’ve said it many times – my photography skills are GARBAGE! Trust me when I say that the black interior looks really nice with the wood moldings. This Revell is another quality one and comes with everything you’d need.

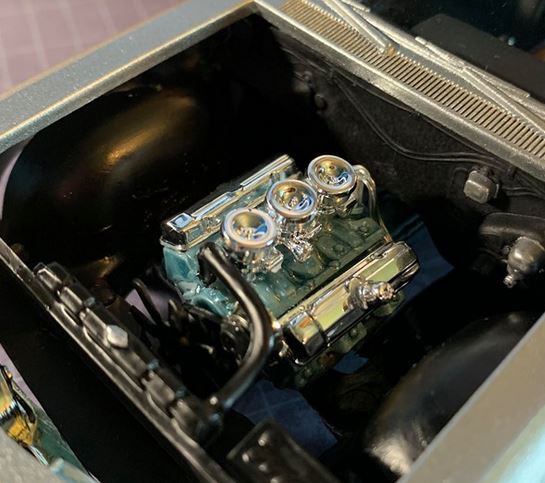
This engine bay looks like most of the Revell Mopars and that is a very positive thing. This was one I was going to potentially swap in a Hemi, but I decided to throw that into the Superbird instead and keep this one a 440-6. Can’t say that I’m regretting it either. Only thing I added here is a wiper motor to help the barren firewall, otherwise it is nice as is. Seems I forgot to paint the cowl drains in front of the windshield, but I’ll get it later.
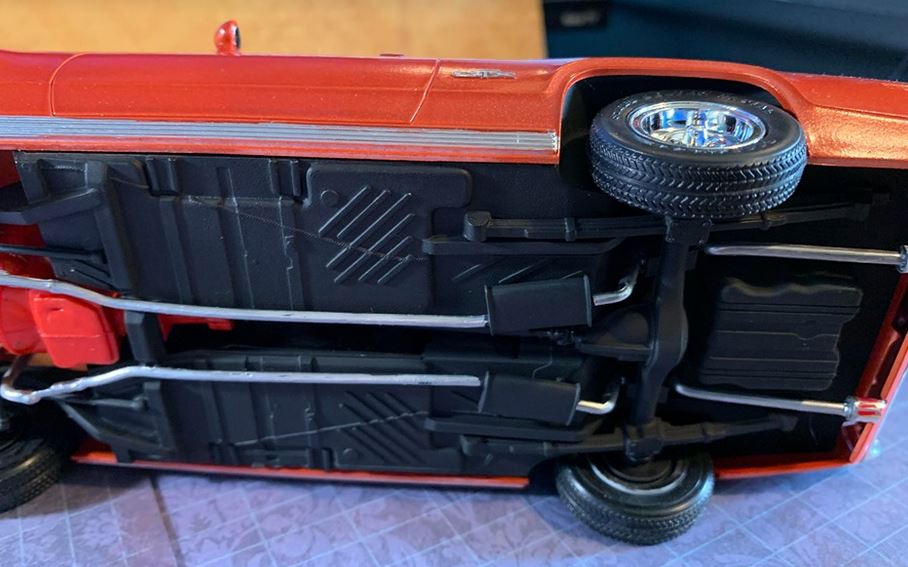
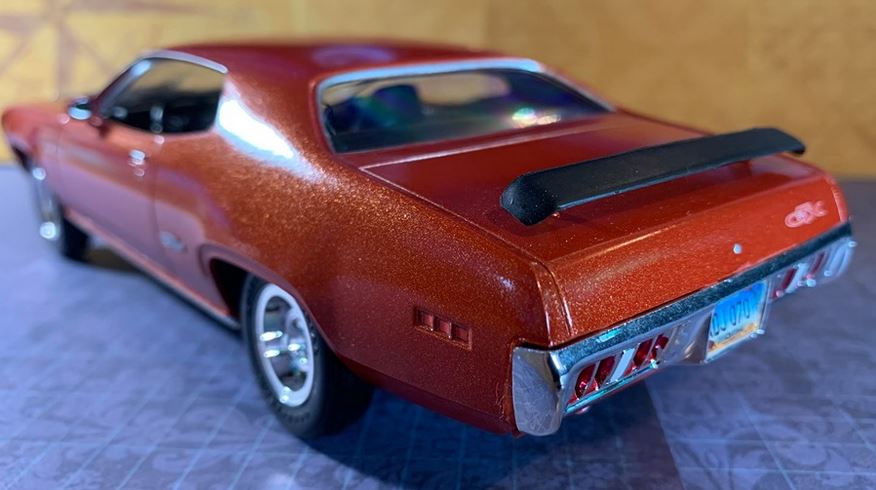
I had fun with the bottom of this one and it helps that it is easy to work with . Everything fits well and there is little to have to add/fix. Only thing I did was add some GTX-style red-lined chrome tips at the back. These were prevalent on them and I love the look – especially with a red/orange car. I used the stock sport rims and gave it a turbo muffler look, but otherwise left the rest as is.
I can say that for all the reissues there were for these kits, they’ve still gotten super scarce. That, and the good build quality of this kit makes for an expensive purchase – usually upwards of $30+. It is also a good investment as the prices are just going upward day by day. Beyond that, however, this is a heck of a kit and a sweet car to display. Forget the shelf and put her to good use!
9.25 Excellent
’72 Chevrolet Chevelle SS

This is a review of the AMT 1972 Chevrolet Chevelle SS 1/25 Kit#

I have to be honest. Most muscle car buffs like the ’70 Chevelle the best of the namesake. I don’t. I like the ’71-’72. It isn’t the quickest (by a long shot), and not the most coveted, but I cannot get past the rear bumper on it. It is just sharp to me. Kind of a cross between a Corvette and Camaro, I find it far more attractive than the ’70. Past that, I also hadn’t made this car once, so it was time for a go.
Now.., it looks like there is a lot to choose from with this car. There isn’t. These kits, like the one I bought, are ridiculously rare. Because of that, the only one I’ve seen in person is the one I’ve done. I assume that the above kits have similar parts, but I can tell you there are differences simply because the one I made didn’t come with the giganto hood scoop pictured in the yellow kit above. Unfortunately, there is no Revell kit, and this one hasn’t been redone in ages.

CAR BACKGROUND :: Heavy Chevy indeed. The Chevelle muscle reign was over and the remaining LS-5 454 was down to a mild 270hp. And don’t bother looking up how tepid the 307 is! It was also one of the only years with the odd-numbered 402ci, V8 (labeled 400). Yes, the Chevelle was not the barnstormer of just 2 years previous, but the look was still there. Say what you like, but it is a very true muscle looking car. Broad haunches; cowl hood; dual exhaust; and an aggressive grille. Tight.

I hate this model with a PASSION. The front end is typically warped, the chrome can be suspect, and it needs a bunch of accessories. That said, like a mobile home with a Jacuzzi, it can be nice with some help. Painted in Testors De Ja Blue one coat, I am happy with the overall outcome. I had to add the side mirror since it is omitted from the kit and I would have loved to have a set of Heavy Chevy decals for the rear, but otherwise it works.
OH how I wish this had a Revell interior. It just wouldn’t fit. The AMT is lackluster and really has a shoddy mold, but you do what you can. I forget whether I had to add a rear-view mirror, but it does have everything else.
And, again, typical AMT yuck. I had to do a lot of helping here and still more could be done. I cut the sadly molded brake boost from the firewall and attached a Revell part from a similar year. I also tossed the LS-6 looking air cleaner for a Chevrolet “basic”. To me, the LS-5 doesn’t need the pomp and circumstance. And the yuck goes on – goofy straight radiator hose; no fan shroud; mediocre battery; and a pathetic radiator cap. Wires help, but it is still a shame.
This AMT’s underside is actually one of the kit’s high points. The exhaust is an easy fit and there is a good bit of detail. Like the 1970 AMT Chevelle, the only thing in need are better looking exhaust tips. I went with the stock rims/tires and painted the mufflers in a turbo motif, but this is an easy one to work with.

I cannot say that this kit was worth the money. I paid about $50 for it and it isn’t worth a third of that. Prices right now are climbing into the $70+ range and if you can get one for that or less, it is a good investment as there just aren’t many of em left. As a builder, however, there are so many ways that it can be a flop that you just have to breathe in and accept the pain of disappointment when it bites you. The chrome can be bad; the body can be badly warped; there is a lot to add/adjust; and the one I bought doesn’t even come with the stripe kit or Heavy Chevy decals that were found on these. But if you are a BIG fan like I am… you gotta have it.
4.5 Bad
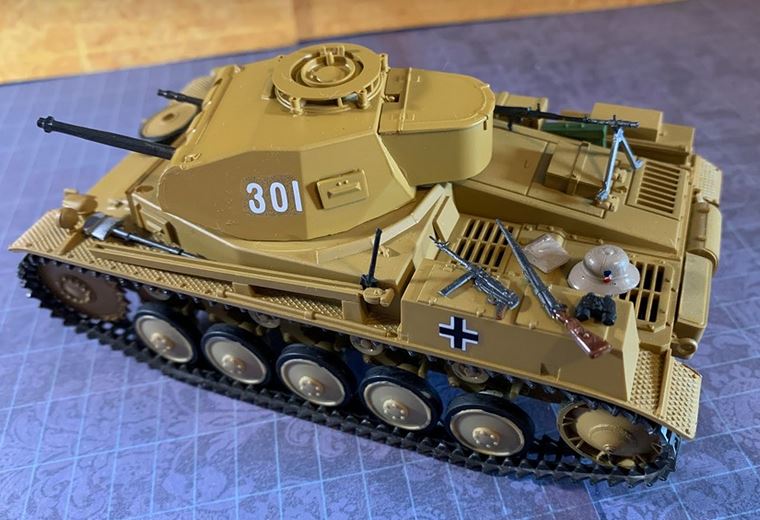
Panzer Kampfwagen II Ausf F/G
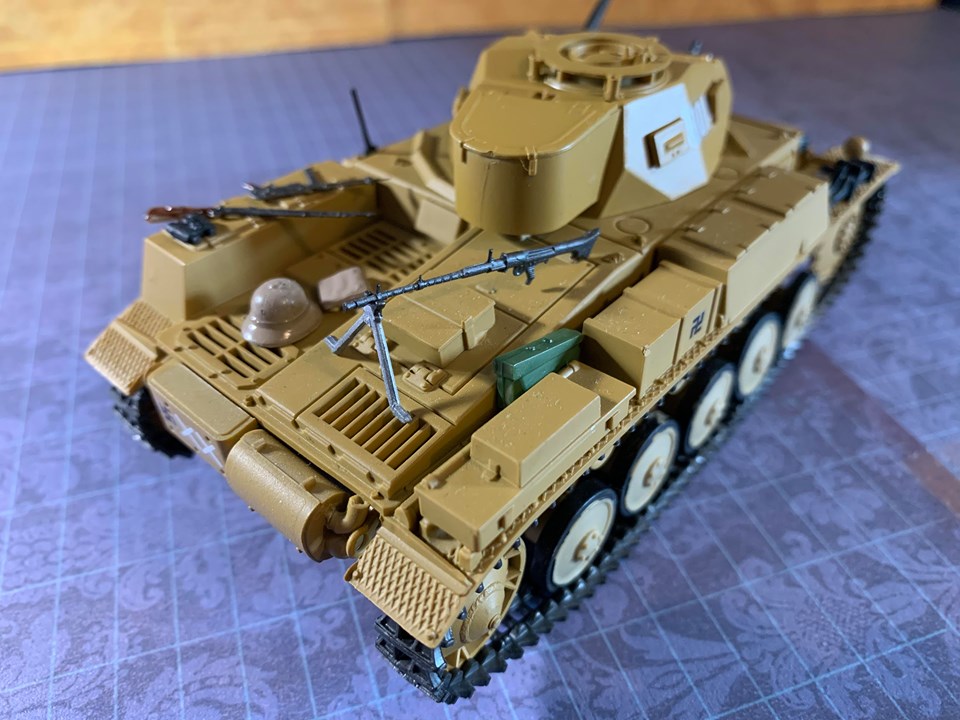
This is a review of the Tamiya 1/35 Panzer Kampfwagen II Ausf F/G Kit#TAM35009

For my next tank review I made the Panzer II. Tamiya seems to make very nice and easily built models, but don’t be fooled by the term “easy”. There are a slew of parts and some odd fitting, but the treads are nice, solid rubber, the guns are movable, and the overall look is really nice when done. Again, I do not use “people” in my builds, so they were omitted, but this kit does have a few of them with tons of options.
This tank had many design flaws early. The Ausf A, B,and C all had significant armor deficiencies and that lead to further redesign. The Ausf F was a much better iteration, but were still a placeholder so bigger, better tanks could be produced (Panzer III, IV). The Ausf F tank would likely have been used in recon missions, but this particular color scheme would have been used in Germany’s Libya campaign.
This light tank weighed only 9.5 tons. It carried a 1×2 cm KwK 30 L/55 autocannon, and 1×7.92mm Maschinengewehr 34. The engine was a Maybach (yes, that one!) HL62 6-cyl capable of about 24mph. For 1936, not shabby, but by 1942, this tank would be at a disadvantage.

So, for paint, I used Model Master Afrika Mustard and it looks about right. This kit’s larger movable turret in the front is really bold looking. The fitting for the big gun is good too – allowing a pose or easy maneuvering. The top can be fussy to assemble to the body, but there isn’t a lot on top to worry about breaking as you press. I included a lot of the gear to the body to add some flair, but it also gives an idea of all the accessories that go with this. For decals I had to use some numbers off a different kit as the ones for this tank were ruined. I’m not sure about the correctness, but it looks nice. I also printed a couple of Nazi symbols that were not included. I understand the hate for them, but I wanted the authenticity.
The only thing I had a problem with was the top fitting (mentioned earlier). I recommend checking it before painting and final assembly. You can sand, or trim whatever you need to make it a smoother assembly. Not a big deal, but something I would have liked to know before-hand (and something veterans to tank-building might already know).
I can say this is another good tank kit. The parts are plenty, there are a ton of people and accessories, and a couple good decal choices. Overall a good buy as well, this can be bought for less than $25. Schnell!
9.0 – Very Good
X-RAY: 1963 Ford Hardtop (Galaxie), 1/25, AMT

This X-Ray is for a rare classic – 1963 Ford Hardtop (Galaxie) Customizing from AMT.
1 set of thin tires with two sets of rims; really nice detailed interior; 2 full chrome trees with many custom parts; 406ci V8 with chrome air cleaner; 2 hoods – one cutout; customizing pieces – grilles, front and rear valances, engine, exhaust. Good: There are few kits with THIS many optional pieces; more chrome than you can imagine. Bad: As much as you can add, this was never an exciting/fast car; some of the fit of the options is meh; pricey.
Price: ~$25+
X-RAY: 1956 Ford Thunderbird 1/24, Monogram

Here is my next X-Ray – a 1956 Ford Thunderbird from Monogram – 1/24th.
1 set of tires/rims with whitewalls (no options); detailed interior; front glass is tiny and has to glue to the chrome windshield trim; removable hardtop with glass; No street parts, no engine options. Good: One of a kind classic; cheap. Bad: Tough fitting glass; not many options; AMT fit and finish.
Price: under $20
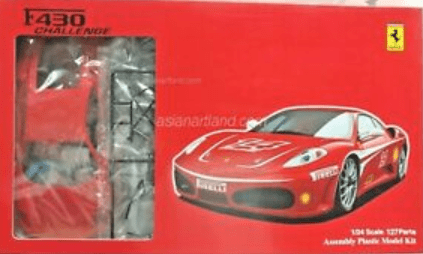
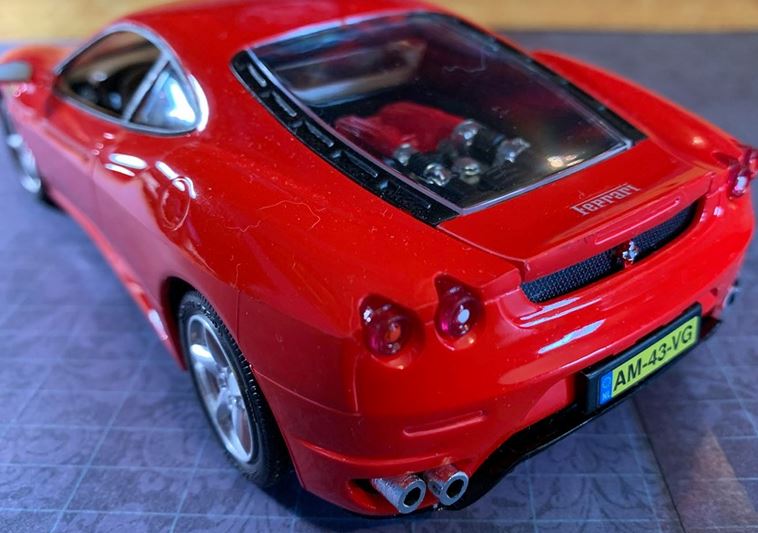
2006 Ferrari F430
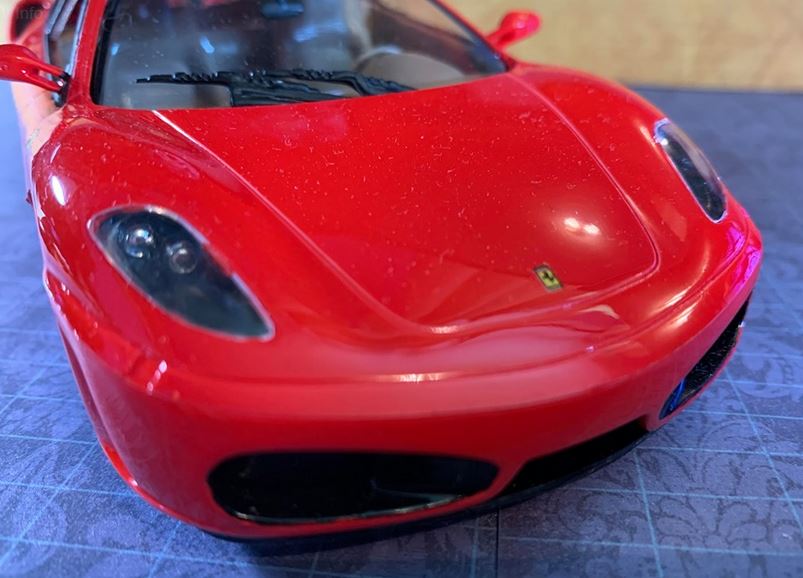
This is a review of the Revell Ferrari F430 kit#85-2033

I have to say that this is one of those cars that I liked from afar. Not something awe-inspiring looking – like that of an Enzo, or LaFerrari. Not world-changing like the F40 or eye candy like a 288 GTO. It was a replacement for an aging vehicle and it didn’t stray too far from its design, purpose and prowess. That said, I really do like this car and this is a good kit… with a large disclaimer.

There are a couple of F430 kits by Fujimi that look fairly impressive but I haven’t done any of them. The Revell kit is cheaper and has enough detail that I cannot believe the extra cost is necessary.

CAR BACKGROUND :: So what was wrong with the Ferrari 360 Modena? It was sleek, elegant, and went like stink. Well, time passes and like anything else, the successor must arrive. Built with a newer, more powerful V8 , the F430 betters its older stablemate in just about every category. Quicker, faster, nimbler, and a heck of a deal next to the opulent 600k Enzo. Road tests range from 3.5-3.8 seconds to 60 and a 198mph top speed. It was impressive some almost 15 years ago, but really those numbers are nose to nose with some 2020 exotics… and some of those aren’t as sweet looking as this stallion is.
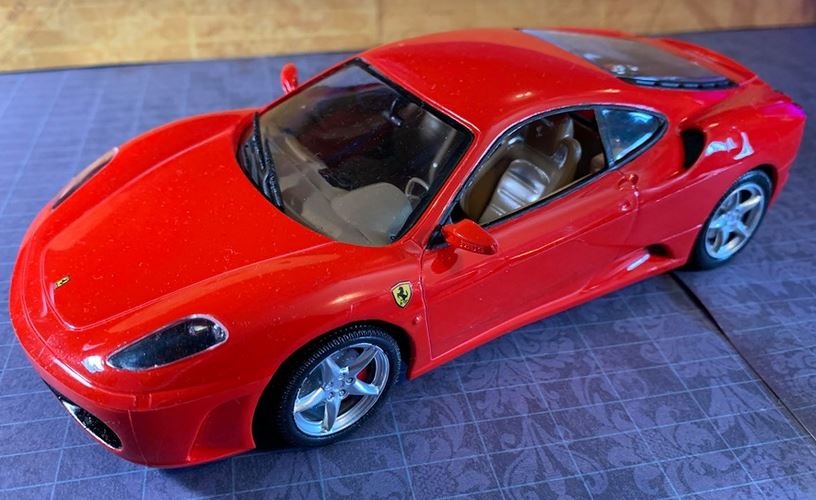
Yup. Red. What else for a Ferrari? Well, I actually like whites, blues, and even a black, so I will be making different ones eventually, but for now, Tamiya Bright Red. Now, where do I start with the laundry-list of “disclaimers” I mentioned? For starters, there are the front lenses that have ZERO lip in which to glue. One bad step and the car will have disgusting “eyelids” where the clear lenses should be. Then there is the flat black detail work. The giant holes in the front are gaping and have tough lines to follow for a good painting. Then black paint around the door sills, the windshield, the rear hatch… you will be flat-sick by the time you get finished. Next boggle are the side vents. Each take either a piece of decal OR a piece of mesh material to cover. They are irritating to cut out, and never fit properly. Lastly, the fit is atrocious. The mid-glass fitting to the completed bottom of the car is a nightmare. You really have to make sure that everything is where it should be EXACTLY, or you’ll have to re-position (or worse). And PLEASE make sure you leave the exhaust tips off until the car is assembled. They will not like the joining process. Whew.

The interior is a fun undertaking, however. There are multiple ways you can do this and have it look pretty sharp. I went with the straight tan, but there are a half dozen other colors/combos that you can use. Half-and-half dash colors and the like would look great. This Revell kit delivers detail in spades though and the finished product is great to look at. BIG side-note here: if you are wondering how you can see inside the car, it is because I cut the glass for “windows-down” look. The side glass is one big piece that covers the interior, but if you are careful and use a sharp hobby knife, you can trim the glass where the pillar meets and insert just the rear triangular piece without having glass in front of the interior. It is slow work and if you rush it could ruin the important rear piece. It IS worth it though.

Anyone who has done an Enzo or the like and then this one will vouch for me when I say that this engine is not only a bit ho-hum, but lacks numbers-of-pieces. There seemed to be a lot of places they could have added things to make it more interesting, but it just turned into painting carefully on a few pieces for detail work.The end result is nice and looks great through the glass lid, but would have liked to put together more stuff than what they gave with the kit.
Something a bit different with the exotics that I will be reviewing is there will most likely not be an undercarriage paragraph because most of these exotics have a basic flat panel underneath. Not news-worthy. I WILL mention if there is something detestable with the bottom build, otherwise forgetaboutit!
Patience is a virtue when working/finishing this car and if you have little, you may want to by-pass this one. The time spent on the little things will drive you wonky and it may not be worth your time/money. This model is getting more expensive due to rarity everyday, but right now it is still a bargain. I’d pick one up for collectors AND one to build. This is too pretty of a car for the closet shelf!
8.5 Good
